Interior Wood Stairway Framing Autocad Drawing
13 December 2019Table of Contents
Interior Wood Stairway Framing Autocad Drawing
What Is Wood Stairway Framing?
Wood stairway framing refers to the structural framework that supports a wooden staircase. It includes the stringers, treads, risers, and support framing that tie the stairs into the surrounding structure. This framework must be strong enough to support consistent use while also being precisely measured for safety and comfort.
Key Components of Wood Stairway Framing
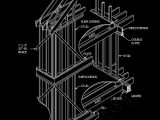
1. Stringers
These are the diagonal boards that support the treads and risers. Most stairways use three stringers—left, right, and center—for optimal strength.
2. Treads
Treads are the horizontal parts of the stairs you step on. They must be cut and installed securely to avoid flexing or creaking.
3. Risers
Risers are the vertical boards between each tread. Not all stairs have them, but they offer extra support and give the staircase a finished look.
4. Landing Framing
If your staircase includes a landing, it needs to be framed just like a floor, with joists and solid blocking.
5. Ledger Boards and Blocking
These secure the stair frame to adjacent structures and add rigidity.
Materials and Tools You’ll Need
-
Pressure-treated or construction-grade lumber (usually 2×12 for stringers, 2×10 or 2×12 for treads)
-
Circular saw and jigsaw
-
Speed square
-
Measuring tape
-
Framing square with stair gauges
-
Galvanized nails or screws
-
Construction adhesive
-
Drill or impact driver
Steps to Frame a Wood Stairway
Step 1: Calculate the Rise and Run
Start by measuring the total vertical height from one floor to the next (total rise). Divide this by your desired riser height (typically around 7 inches) to determine the number of steps. Then, calculate the run (tread depth), usually between 10–11 inches.
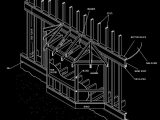
Step 2: Mark and Cut the Stringers
Use a framing square with stair gauges to mark the rise and run on your stringer boards. Cut out the notches carefully with a circular saw and finish the corners with a jigsaw.
Step 3: Secure the Stringers
Attach the stringers to a header or ledger board at the top and secure them at the base. Use metal stair brackets or angled blocking for added support.
Step 4: Install Treads and Risers
Once your stringers are level and secure, install the risers (if used) and then the treads using wood glue and screws.
Step 5: Add Railings and Finishing Touches
After framing is complete, install railings, balusters, and other finishing elements to comply with safety codes and enhance visual appeal.
Code Compliance and Safety Tips
-
Check your local building codes for maximum riser height and minimum tread depth.
-
Ensure all stairs have consistent rise and run to avoid tripping hazards.
-
Use pressure-treated lumber for any outdoor stairs or stairs exposed to moisture.
-
Always double-check measurements before cutting stringers to avoid costly mistakes.
Common Mistakes to Avoid
-
Inaccurate measurements for rise and run.
-
Using undersized lumber for stringers or treads.
-
Failing to securely anchor the stairway to surrounding structures.
-
Ignoring building codes or handrail requirements.
Why Quality Framing Matters
Poorly framed stairways can sag, squeak, or even fail over time. Investing time in proper framing ensures not only safety but also longevity. A solidly framed stairway feels stable underfoot and adds value to the home.
Conclusion
Wood stairway framing is both a science and an art. While it may seem daunting at first, understanding the basic principles and following best practices can help you create stairs that are both functional and beautiful. Whether you’re building from scratch or replacing old steps, take your time, measure twice, and build with confidence.
To download more AutoCAD free templates you can visit www.cadtemplates.org